
Wednesday, December 11, 2013
Bountiful Blessings
I marked off another item from my to-make list this week. A wool appliqué framed piece for the breakfast room. I purchased both the wool kit and the bare wood frame at Back Door Quilts in Greenwood, Indiana.

Thursday, December 5, 2013
She Sat on a Tuffet
I just like saying that word - tuffet. Tuffet, tuffet, tuffet. It makes me smile. So this little bird on a tuffet had to be mine when I saw this kit at my local quilt store a few years ago. Then the poor thing got stuck in the waiting-to-be-made drawer while I got busy with other things. I finally gave her wings this week.

This project combines two different patterns in the book, A Bird in Hand by Renee Plains.

While I was in the mood for wool appliqué I also worked on this little travel sewing kit.

The inside has a pocket for a thimble and a few wool pages for needles.

It also has a pocket for some embroidery scissors.

I saw two different classmates from high school comment on Facebook this week about how they were bored. I had to laugh. I've never been bored and I know I'll never live long enough to finish my to-do list. I'm glad I was able to mark two more off the list this week. Next!
Tuesday, December 3, 2013
I'd Like One of Those in Cherry, Please?
My new cherry loom didn't come with a bench. While making the shuttle trap, the hubs casually mentioned that he could probably make a bench to match. (I think he was looking for an excuse to spend more alone time in his basement workshop.) A few weeks later this appeared.


I've tried several different benches over the years and find I really like the adjustability of the Harrisville loom bench design. Only problem is they don't come in cherry. So he copied the maple bench in the far right corner of this next photo and made the one on the left.

Pretty slick, eh?
Sunday, December 1, 2013
The Latest in Canine Couture
Lucy, our beagle, is eleven years old, she'll be twelve in February. For the most part she still gets around pretty well for an old girl. I noticed the other day that she's been shaking a lot lately. At first I thought she was just slow to pick up on the Harlem shake craze (old people are like that). But after she gave me the are-you-crazy look a few times when trying to get her to go outside, I finally figured out she's just cold (old people are like that, too).
Lucy isn't exactly a petite beagle. In fact, she and Large Marge have a lot in common. A fashionable ready-made dog coat for a plus-size beagle is about as hard to find as a good man. I finally decided custom couture was our only option.
I started by taking her measurements, promising her I wouldn't post those online for all the world to see, and sketching out a rough pattern on a paper bag.

Then I made a mock up out of some unbleached muslin for her first fitting.
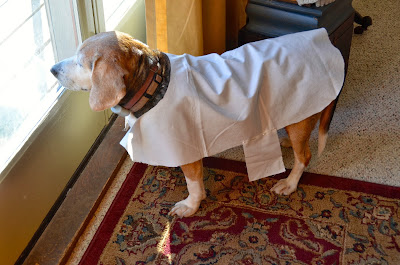
After a nip here and a tuck there, we found the perfect pattern to work from. I chose a couple of non-pill fleece fabrics from the craft store (they were 40% off, hooray!) Then quickly assembled the first bone print jacket together using velcro for closures. Ethel wanted to know if I could make her one with tuna fish.

Then I made a paw print version. I really wanted to get the cheetah print because I think it would be hilarious to watch her slowly toddle around in that, but she doesn't like it when I laugh at her - maybe I'll make her one for her birthday.

In the mean time these seem to be doing the trick, she doesn't mind going outside in the cold as much.
Saturday, November 30, 2013
A Lady's Work-Box
I searched high and low for the perfect embroidery work box. It needed to be just large enough to hold my embroidery hoop, scissors, threads, and needles, yet small enough not to take up half the sofa. Of course, I wanted an antique or vintage model. I found some I liked, but I didn't like their insane prices. So I decided to make my own.
I started by working a cross stitch pattern by Blackbird Designs.

Next, I gave a cheap wooden box from the craft store a coat of cranberry acrylic paint followed by a coat of dark Briwax.

Then I cut pieces of mat board to fit both the top and bottom of the inside.

And one for the top. I also cut four layers of batting and glued them to this mat.

I cut fabric two inches larger than the mat board and applied with fabric adhesive. I also made a pocket for the lid to hold my old-lady reading glasses.

Then I wrapped the stitched piece around the batting and mat, stitched it in place and just inserted it into the top frame of the box.

It is perfect for what I needed and didn't cost me a small fortune. I think I may even make a small needle keep to match.
Friday, November 29, 2013
A Victorian Closet - Some Assembly Required
While driving around killing time one afternoon of late, we happened across a new antique mall. It has quickly become one of our favorites because of its great finds. Since moving here over a year ago we've been hoping to add a nice victorian armoire. There's very little closet space in this house so I'm sure the original owners had at least a few around. Since my style leans towards the more primitive, not all victorian furniture strikes my fancy. I've always loved the spoon-carved Eastlake pieces though, they kind of remind me of folk art, so when I saw this one I knew it was the one. The guys managed to get it home all in one piece, however there was only one minor issue - getting it upstairs.

My brother is six foot tall, so you can tell this is not a small piece.

There was no way that thing was going up and around those steps, so we had to get tools involved.

Luckily, the people who made this thing had the same problem so they built it to be reassembled.

Some pieces actually just snap in place with dowels.

During the build we had it inspected to test for structural integrity.

I was impressed with how quickly it went together.

I don't think a modern ClosetMaid system would go together quite this fast, and it sure as heck wouldn't look this good.

Wednesday, November 27, 2013
Tools of the Trade
Now that the room is ready for me to settle in for the winter, I started tackling some projects to help make my time spent there more enjoyable. I started off with a tote bag to carry my cutting mat and rulers when I take my sewing on the road.

The pattern is from High Street Quilt Designs. The pattern called for selvages to be layered for the center pocket, but I chose to use a needlework print instead. I have to say this pattern was not the most well written one I've ever seen. I managed to get the bag done, but I'd never make another one this way.

Next, I recovered my ironing board with one of my favorite fabrics. I don't know why I didn't do this sooner, it was so easy to do. I loosely based my cover off of the one in this tutorial.

Then, I used the leftover scraps from those projects to make a weighted pincushion and thread catcher for my sewing table. I used the tutorial at Sew, Moma, Sew.

Finally, I decided if I really want to get all my unfinished projects done, what I really need is a strict supervisor. I'd like you to meet Large Marge. An industrial working girl born in 1948, she decided she would like to spend her retirement years here in Sheville. Isn't she fabulous? I just adore her.

Tuesday, November 26, 2013
A Space to Create - The Grand Reopening of Sheville
Well, it was a bigger, fatter, and harrier deal than I ever anticipated, but after a few weeks of restoration Sheville is once again open for business. Like a toddler that never wants to give up her toys, I was determined I could keep all my looms and fit ALL of my spinning, knitting, weaving, quilting, sewing and needlework stuff into one room. It was just going to require a little planning is all--and that minor issue of removing a door.
Ladies and Gentlemen, welcome to New Sheville. If you desire, you can refresh your memory with before pictures here.

My first space saving strategy was to somewhat divide the room into zones, keeping like things together so I don't have to wander all over the room looking for what I need.

The sewing zone is on the right in the window area.

Weaving zone on the left along the wall.

I tucked the reference library into the corner behind the kitchen door.

The wall color is Benjamin Moore Providence Olive. I chose the color to calm down the crazy yellow that was in here before. I no longer feel the need to wear sunglasses inside on a sunny day. The green works well to neutralize the red brick so it is easier to select fabric colors in this room now. It also flows well with the color scheme in the rest of the house.

The key to fitting all the hobbies in one room is the magic corner below. It is like the swiss army knife of interior design. This one little corner sports my design wall, a cosy chair for hand sewing, my basket for knitting, and my needlework box. I can also use the chair for spinning, and the vanity bench next to it doubles as an end table or a stool to reach those quilt blocks all the way at the top.

Here is the magic part, the chair also swivels so I can wind a warp sitting down. I thought this was one of my best ideas yet.

In the center of the room you'll find a workspace to keep my tools handy. Most of my knitting stash hides in the drawers.

I also created a winding station close to the looms.

On the opposite side you'll find my dual cutting/ironing station. The baskets below organize my scraps, and as you can see by the holes in them, they also double as cat scratching posts. *sigh* That cat is why I can never have nice things.

If I decide to do a marathon sewing day, I can just pull out my old ironing board and go to town both cutting and ironing without moving the cutting mat back and forth on the top of the station.

I converted an old entertainment center into a storage unit by just taking the wheels off my plastic storage drawers. This is where my UFOs and quilt kits wait for my attention. I also have my Bonnie Hunter scrap storage system going on in there. Bottom drawers hold sewing notions, batting, etc.

The rest of my fabric stash still lives in the pie safe. I see a lot of craft/sewing rooms where people have all of the fabric and yarns out so you can see them. While I think it looks beautiful, it really isn't a good idea. The sun will absolutely fade whatever is showing, especially in a room with this many windows. Setting it out also leaves it exposed to dust, so I choose to stash my stash away from all that. This pie safe is my compromise, you can kind of see it, but the screen keeps the dust off.

I've stored most of my coned yarns inside the laundry room in boxes, but a few linger in the stack of furniture.

So where is my spinning stash you ask? Ha, it's still at the mill. It is most likely going to have to go back into the shower when it comes back. Okay, so it is almost all in one room.
Tuesday, November 19, 2013
Bloglovin'
I am finally getting my act in gear and joining Bloglovin'. So this is the obligatory post to claim my blog over there.
Follow my blog with Bloglovin
Follow my blog with Bloglovin
Wednesday, November 13, 2013
All She Needs is a Little Paint and Spackle
This old house is in need of a facelift both inside and out. Now that the cracks and crevices on the outside have been filled, it is time to start on the inside. The ceilings in both the breakfast room and New Sheville are in really bad shape. The textured cathedral ceilings in Sheville are way past our comfort zone and we don't even have a ladder that can reach that high, so we called in a professional. The breakfast room only had a crack running along the join on the exterior walls, most likely caused by the house sitting empty for a few years, but it was also a little dingy.

It is going to look a wee bit better, yes?

It is going to look a wee bit better, yes?
Monday, November 11, 2013
It's Always Something
So remember the chimney and brickwork we had done early this spring?
Yeah. I was never really pleased with the quality of work they did, but I was told I was being overly critical. Now, every time it rains there is water flowing down the chimney and pouring out the ceiling.

So we hired someone to come fix the roof. They did--and it is still leaking.
I am not impressed.
You'll notice that the rain soaked plaster ceiling is located directly above the chair where I sit to write. Now, every tiny sound around this old house makes me think the ceiling is coming crashing down on my head. I've mastered the duck and cover move, but I still feel like maybe I should wear a hard hat while I am working.
Sunday, November 10, 2013
Stash Busting Bonanza
The worst part about living in a historical home--besides the never ending drain to the finances--is the complete lack of storage space. I've determined the only way I can live harmoniously in New Sheville is not to build more storage, but to eliminate the need for more storage. Ever since the Tour de Fleece this summer, I've been doing a pretty good job of spending my evening hours engaged in the activity of reducing the stash. I've spun and dyed a lot of yarn.
I have made three scarves.
I have made fingerless mitts for the whole family.
And I finally finished a pair of socks I started a million years ago.
And yet, somehow, it doesn't even look like I've made a dent. How can that be? It has to be some sort of unsolved mathematical mystery.
 |
| Light Walnut |
 |
| Plied with mohair |
 |
| Cochineal |
 |
| Dark Walnut |
I have made three scarves.
 |
| More of a cowl really |
 |
| Mountain Colors River Twist yarn |
 |
| Kid size |
I have made fingerless mitts for the whole family.
 |
| Mine |
 |
| The boy's |
 |
| The girl's |
And I finally finished a pair of socks I started a million years ago.
 |
| I really don't like making socks |
And yet, somehow, it doesn't even look like I've made a dent. How can that be? It has to be some sort of unsolved mathematical mystery.
Subscribe to:
Posts (Atom)